Scheduling & Appointments
Scheduling in ServCraft is the process of assigning a specific time and technician to a job. This is done through Appointments — the time-slot records that sit between a job and the calendar.
Jobs vs Appointments — The Key Distinction
This confuses a lot of new users:
| Job | Appointment | |
|---|---|---|
| What it is | The work to be done | The scheduled time to do it |
| Created when? | First — before scheduling | After the job is created |
| Has a time slot? | No (just a start date) | Yes — specific start and end datetime |
| Has a technician? | Optional (primary assignee) | Yes — one or more technicians |
| Multiple per record? | No (one job) | Yes — a job can have many appointments |
One job, many appointments: If a technician visits a site on Monday, then needs to come back on Thursday to finish, those are two appointments linked to the same job. All time, parts, and notes are still captured on the same job record.
The Appointment Scheduler
Access the scheduler from Schedule in the main navigation (or Appointments in some configurations).
What You See
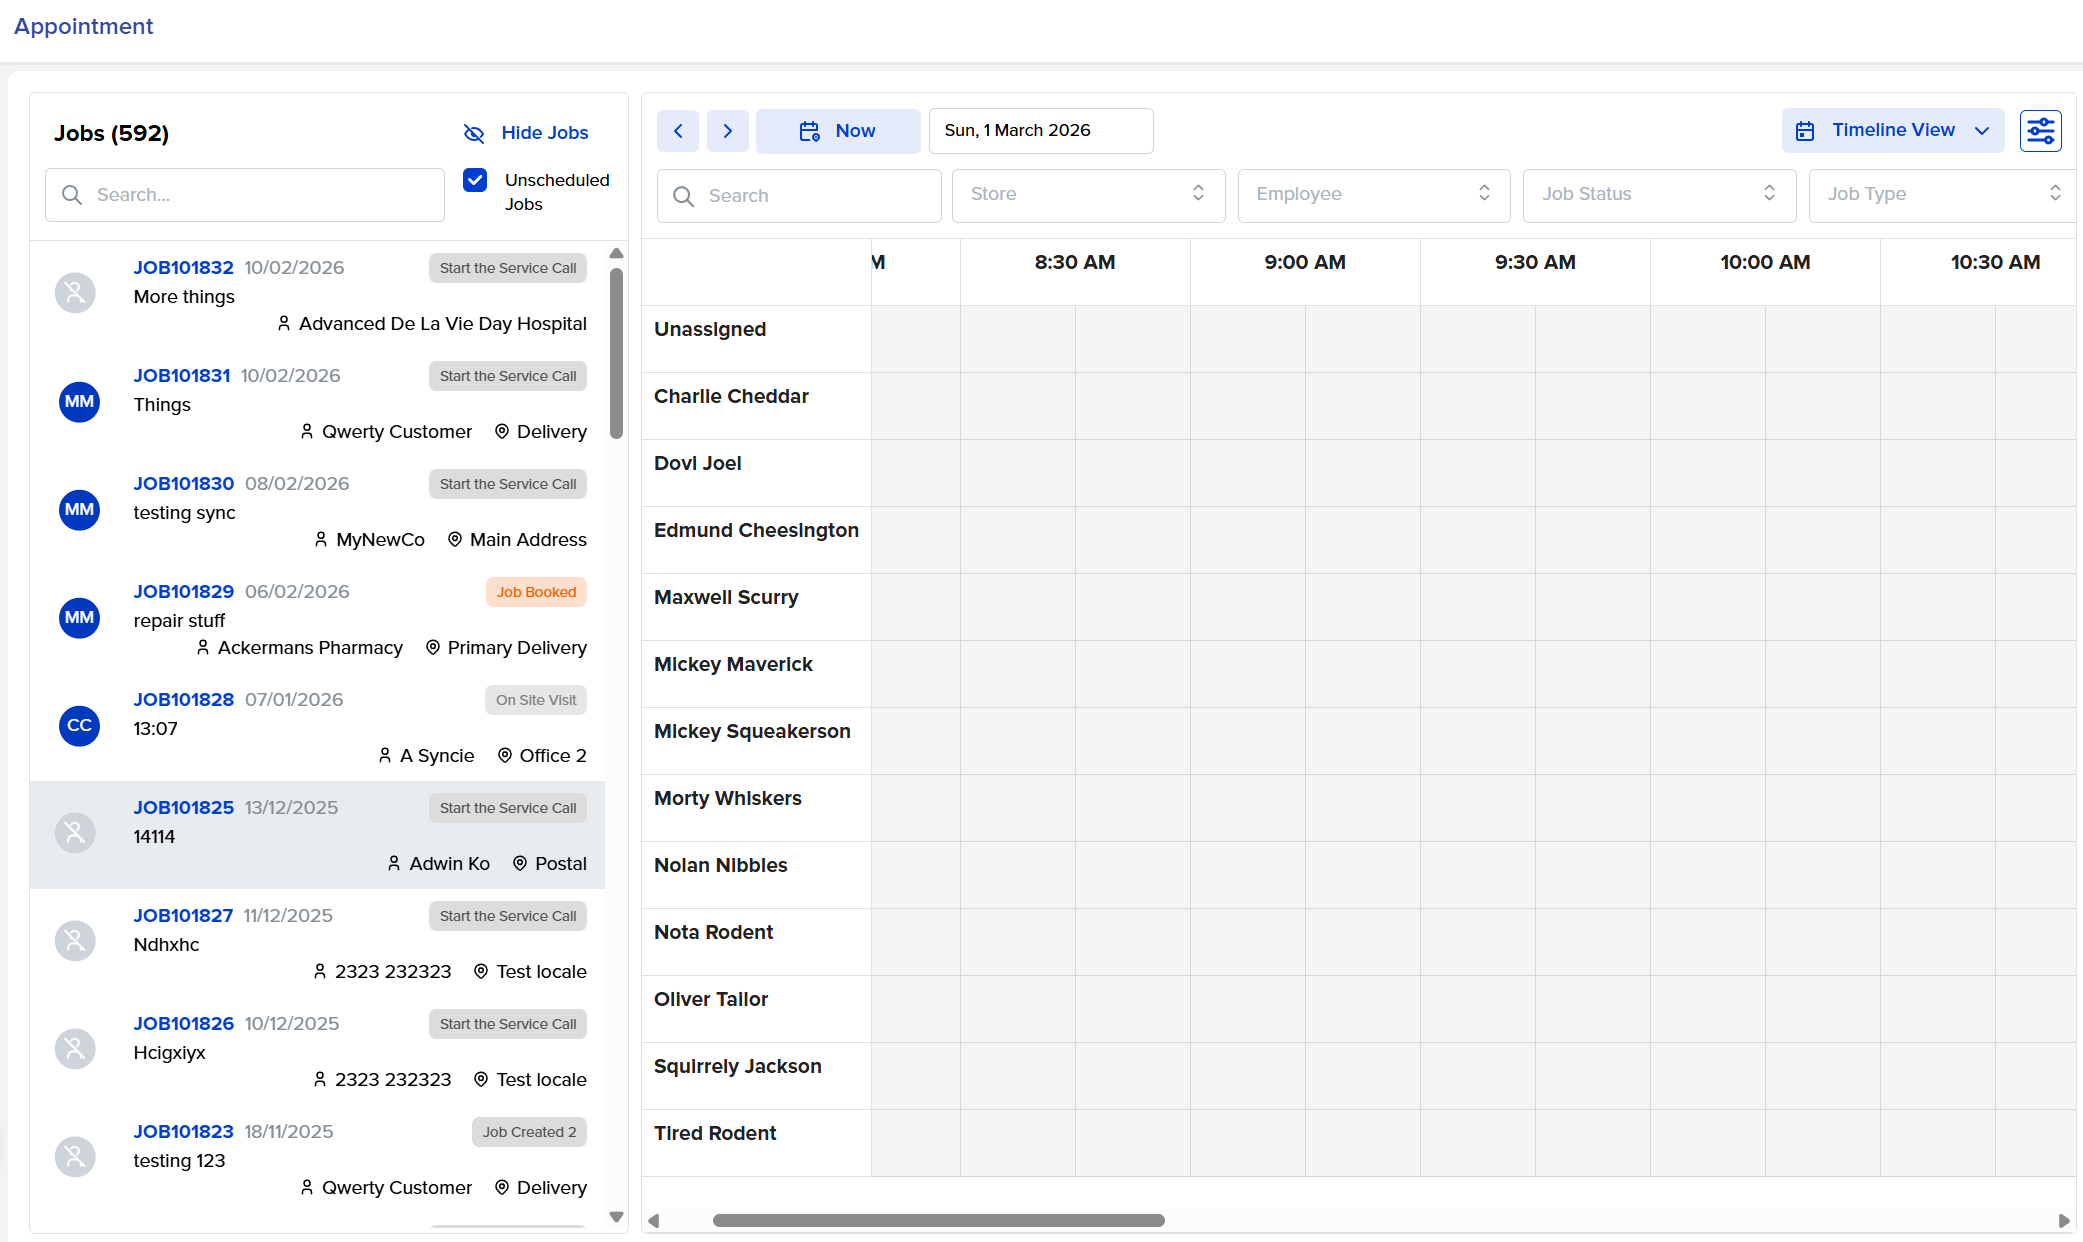
The scheduler is a calendar view with:
- Columns = time slots (15 or 30-minute increments, configurable)
- Rows = individual technicians (one row per person — this is the timeline view)
- Appointment blocks = colour-coded by the job's current status, draggable
Appointment colours reflect job status: Each appointment block shows the colour of the job's current status (configured in Settings → Jobs → Statuses). This lets you see at a glance which appointments are In Progress, On Hold, Awaiting Parts, etc. — without opening each one.
View Options
| View | When to use |
|---|---|
| Day (Timeline) | Detailed single-day view — one row per technician, see everyone's full day at a glance |
| Week | Overview of the week across all technicians |
| Work Week | Mon–Fri only |
| Month | High-level calendar — less detail, better for planning |
Filters
| Filter | Effect |
|---|---|
| Store | Show appointments for a specific branch only |
| Employee | Show one technician's schedule |
| Unscheduled Jobs | Show the side panel of jobs waiting to be scheduled |
Slot duration: You can change the calendar slot size (15 or 30 minutes) — click the slot duration control in the scheduler toolbar. This setting persists between sessions.
Creating an Appointment
Method 1: From the Scheduler (Drag and Drop)
- Open the Jobs side panel in the scheduler (usually a tab on the left or right)
- Find the job you want to schedule (unscheduled jobs show here)
- Drag the job from the panel onto the calendar — drop it on the technician and time slot you want
- An appointment is created automatically
Method 2: From the Scheduler (Click to Create)
- Click on a time slot on the technician's row
- A "New Appointment" form opens
- Search for the job you want to link it to
- Set the duration, add notes if needed
- Save
Method 3: From the Job Record
- Open the job
- Click + New Appointment
- Select the date, time, duration, and technician
- Save
Appointment Fields
| Field | Notes |
|---|---|
| Title | A short name for the appointment (required). It fills in as "Appointment for" and the job number when you link a job |
| Customer and Contact | Who the appointment is with (both required) |
| Linked job, query or project | Optional. The web app can link the appointment to a job, a query or a project once a customer is chosen. The phone links to a job or a query |
| Start Date / Time | When the appointment begins |
| End Date / Time | When it ends (sets duration) |
| Appointment Type | On-Site, Phone Call, or In-Store |
| Technicians | One or more technicians assigned (all appear on their respective calendars) |
| Location | Where the appointment takes place (from the job) |
| Description / Notes | Internal notes for the technician |
| Customer Reminder | Auto-send reminder to customer before appointment |
| Employee Reminder | Auto-send reminder to technician before appointment |
On the web, changing the customer on an appointment clears any job, query or project it was linked to, so link it again afterwards.
Appointment Types
| Type | Use when |
|---|---|
| On-Site | Technician travels to the customer's location |
| Phone Call | Remote support or follow-up call |
| In-Store | Customer brings the item to your workshop |
Appointment Reminders
Both the customer and the technician can receive automated reminders. Set the reminder timing at creation:
| Timing | What it means |
|---|---|
| No reminder | No automated notification |
| 1 hour before | Reminder sent 1 hour before appointment start |
| 2 hours before | 2 hours before |
| 6 hours before | 6 hours before (good for morning dispatch) |
| 24 hours before | Day-before reminder |
Reminders are sent by email or SMS depending on the customer/employee's notification preferences.
If Notify customer now (on the phone, Send customer reminder on save) is ticked, the reminder fires immediately when you save the appointment (regardless of the scheduled time). Use this for same-day or very-soon appointments. Notify employee now does the same for the technician.
On the phone the two reminders are not a list of choices. Each is a number of hours before the appointment, from 0 to 48, with 0 meaning no reminder.
Assigning Multiple Technicians
A single appointment can be assigned to multiple technicians. All assigned technicians:
- See the appointment in their personal calendar
- Can clock time against the job
- Are notified (if notifications are enabled)
How to add multiple technicians: When creating or editing an appointment, use the employee selector to add more than one person. The calendar shows the appointment on each technician's row.
What the Technician Sees
On the mobile app, the Appointments screen shows one week at a time. A strip at the top marks the days that have appointments, with arrows for the previous and next week, and a search box. Technicians tap an appointment to see its title, type, start, end, description, contact, company, location and address, the linked job or query, the assigned employees and the customer reminder. Tapping the linked job or query opens it. The dashboard also lists Upcoming Appointments for the next 7 days, and a job's Appointments row, shown to people with the appointments permission, lists the appointments for that job and lets the technician create one already linked to the job.
The mobile app surfaces only their appointments — technicians don't see other technicians' schedules (unless they have the View all items permission). In a business with more than one store the phone also shows only appointments from the stores the person is linked to.
Creating and editing on the phone: Create Appointment needs a title, start and end (the end must be after the start), an appointment type, a customer contact and, in a multi-store business, a store. Some fields lock once the appointment exists:
- The customer and the location cannot be changed when editing an appointment
- The customer is also fixed when the appointment is created from a job or query
- A job or query link that was set before editing cannot be changed
- The store can only be chosen when the appointment is created
When a job or query is linked to an appointment that has no employees yet, the phone offers "Assign employees from" that job or query. The Cancel appointment button on the edit screen asks "Cancel this appointment?" and removes the appointment from the lists. Like deleting on the web, it does not close the job.
Managing Appointments
Rescheduling
From the scheduler: Drag the appointment block to a new time slot or technician row.
From the appointment record: Edit the appointment and change the date/time.
Rescheduling an appointment does NOT change the job's dates automatically. If the job's start date needs updating, edit it separately.
Cancelling an Appointment
Delete the appointment from the scheduler or from the appointment record. This removes it from the calendar but does not close or cancel the linked job.
If you need to notify the customer of a cancellation, do this manually — appointment cancellation does not automatically send a notification.
If the customer has cancelled the whole job, deleting the appointment is only the first step. The job also has to be closed, for example with a custom "Cancelled" status that has Close Job ticked. See The Job Lifecycle for the full steps.
Viewing All Appointments
The appointment list view (Appointments → List) shows all appointments with filters for date range, technician, store, and status. Useful for reporting on what was scheduled in a period.
Exporting the Schedule
Appointments can be exported to Excel from the scheduler. Click Export to open the Export Appointments window, which offers three things: a date range, a list of employees to include, and an Include Unassigned switch that appears once you have picked at least one employee. The date range is pre-filled with the last seven days, so an export always covers a period even if you don't touch it. There is no filter for job status or job type on this window — narrow the results afterwards in the spreadsheet. The file downloads as an Excel workbook named "Appointment List" plus the date and time.
Exporting requires the Exports permission — users without it won't see the Export button at all.
There is no print or PDF option on the scheduler. If someone asks for a printed day sheet, export to Excel and print from there.
Common Questions
"An appointment is showing at the wrong time — was there a timezone issue?"
Check the business's timezone in the Company settings. Times are converted for display based on the company timezone — if it is wrong, times will appear offset. Note: changing the timezone requires all connected mobile devices to resynchronise their data.
"A technician says they don't see the appointment on their app"
Check: (1) Is the appointment assigned to their employee record? (2) Is their mobile app synced? (3) Do they have the Jobs permission? (4) Is the View all items permission off? (if off, they only see jobs assigned to them).
"I need to schedule a job for a technician but they don't appear in the scheduler"
The scheduler shows all active employees. Check Settings → Employees and confirm the person's employee record is active. If you filtered the scheduler by specific employees or a store, clear those filters.
"We overbooked — two jobs are at the same time for the same technician"
The scheduler warns about double-booking but does not prevent it: when you save an appointment that overlaps another one for the same employee, a "Schedule Clash Found" confirmation appears listing the affected employees — you can still choose to save. In Day view, overlapping appointments are shown side by side on the technician's row.
"Can I link the scheduler to Google Calendar or Outlook?"
No. ServCraft does not integrate with Google Calendar, Outlook or any other external calendar, and appointments cannot be synced, subscribed to or exported as calendar entries. The only integrations ServCraft offers are the accounting systems (Sage One, Xero and QuickBooks) under Settings → Company → Integrations, and PayFast for payments. For a copy of the schedule outside ServCraft, use Export to Excel in the scheduler's menu to download the appointments as an Excel file (see Exporting the Schedule).
"Can a customer see their appointment?"
Yes — if the Customer Zone is enabled and the customer has access, they can see their upcoming appointments. The appointment reminder also links to the Customer Zone.
"I need to add the aircon number (or other equipment) to the schedule"
When the "schedule" is repeat work, the customer means a recurring job. Link the unit to the recurring job as a customer asset, and every job it generates carries that asset. See Linking equipment to a recurring job.